Tuesday, June 30, 2015

The Plans Are In!

City Of Seattle, DPD DoNotReply@seattle.gov

3:36 PM (0 minutes ago)
to me
Thank you for using the City of Seattle Department of Planning and Development's Online Permit Fee Payment system. This is a receipt confirming payment of fees for Permit #6461743.

Please do not reply to this email. If you have questions about your permit fees, please contact the DPD Applicant Services Center at (206) 684-8850.
Transaction Date06/30/2015 3:36 PM
Payment Transaction  # 719803
Project Info# 6461743
817 NW 118TH ST
Construct addition and alterations to existing single family residence per plan
Project ContactAlastair Dallas
817 NW 118 St
Seattle, WA 98177
(408) 596-6757
Cardholder NameAlastair Dallas
Credit CardVisa ****-****-****-1047
exp 08/2017
Total Amount Paid$1,304.25
Fee Detail
AmtDescription
$869.50  VALUE BASED - PLAN REVIEW (INTAKE)
$434.75  VALUE BASED - PERMIT (INTAKE)
This is a receipt of payment. This is NOT a permit, nor is it proof of having a permit.

Please retain this receipt for your financial records.


Department of Planning and Development (DPD)
700 Fifth Ave., Suite 2000
P.O. Box 34019
Seattle, WA 98124-4019
(206) 684-8600

Wednesday, June 17, 2015

Impacted Building Department

Here's how the Seattle Dept. of Planning and Development (DPD) system works. You throw together a basic set of plans and submit them online. In a couple of days, you are approved for intake. At this point, you can make an intake appointment and you have up until that appointment date to upload the final documents. After your intake, the normal review period is 2-3 weeks. Then you have to submit corrected plans, possibly in two or more rounds, but the process leads to a permit.

This system should have been explained to me when I visited the Applicant Services Center in late February. Instead, I was assigned a Junior Idiot who was no help at all. He directed me to waste $200 and 2 weeks requesting an ECA exemption that was promptly denied.

I submitted plans on June 12, and I expected an intake appointment this week. Instead, they are scheduling intake 10 weeks from now. That means the earliest building permit is September.

But I called Applicant Services this morning (684-8850). No automated wait. Katie answered immediately and explained that people cancel their intake appointments and she told me how to reschedule my appointment sooner by pouncing on a canceled date. (It's the Start Your Full Permit Application section, tab 3 (Intake), click "Cancel or Reschedule.") She looked at my file and said she would keep an eye out for cancelled appointments and try to help me get an earlier date (no promises, of course).

My intake appointment is currently August 21. It would be great if I could move it up to July, but I can't hope for too much. So, I need to improve the plans...perhaps with a structural engineer's help. When they are complete, Katie told me to click "Submit for Intake." That's irrevocable, so you don't do it lightly. The plans cannot be changed after that, and the intake appointment can't be rescheduled. But, it's possible that the plan review could start before the intake, so the time to permit would improve. Again, no promises.

Update: 4pm the same day, Katie Jones sent an email--she grabbed a cancellation, so my new intake date is July 10. Amazing! Need to click "Submit for Intake" before 7 a.m. that day (it's a Friday), and preferably sooner.

Sunday, June 14, 2015

Speaking of color ideas

The Trees Room siding is cement board, like HardiePanel Smooth in Countrylane Red. The existing house has wood siding, vertical over horizontal. I think the new north face should be all horizontal, which can be HardiePlank Lap Beaded Smooth, perhaps in Cobblestone (a light gray).


I'd like a more custom finish on the Trees Room--I wonder if we can apply a patina-like stain on the HardiePanels.


Saturday, June 13, 2015

Friday, June 12, 2015

Requesting an intake appointment

The drawings are about done, ready to submit to the City of Seattle DPD. So we used the online Project Portal to submit the drawings, the geotechnical report, and the DPD Cover Sheet. With luck, the DPD response will be to schedule an intake meeting. I'm concerned that they will require structural calcs and details, so I didn't spend much time on that aspect of the plans and I'm working to line up a firm that can turn the project around quickly. Dibble Engineers is a possibility.

Update: Ken Jensen, the architect who took the palm tree, recommends Roland Heimisch of Kenmore, http://www.tecinstruct.com/,


Sunday, June 7, 2015

Coming out of the closet

Many people are replacing a typical closet with a built-in wardrobe, according to the LA Times and Starcraft Custom Builders (it's a good article, or I wouldn't reference a builder). I haven't investigated Ikea yet, but this article references Pax cabinets with Hemnes (like my bed) doors.

Ikea, as usual, has a pretty cool system, as shown in this brief, soundless video:

Bedrooms 2 and 4 are all set for closets--2 with its tiny, old-fashioned one, and 4 with its walk-in closet with washer/dryer hookup.

Bedroom 3 would save some space--a drywall closet is 30" deep (24" + stud wall), but the Ikea boxes are just shy of 24". Bedroom 1 has two closets--the old-fashioned one by the chimney and a wide one that would look good without fin walls and clunky doors. We also have 3 linen closets: Ba1, by the laundry, and Ba2.

The Pax units come in two heights: 79.25" and too high (except for Br3). Widths are about 20", 40", 60" and depths are, roughly, 15" or 24". The cabinets come in white, black (like my bed), and what they call "white stained oak effect."

Bedroom 1 is 86" wall to wall. This would be 100% accessible, unlike the current 63" bi-sliding doors. Two (his and her) 40"w units (like this).


Bedroom 3 is 52" wide with walls. If we just mount the Ikea stuff, we have 73" door jamb to door jamb. (We might want to compromise and leave one fin wall for the light switch. Say 61". 60"w, x 93.125"h, like this.

Ba1 16" wide, 15" deep. May have to be custom.

Linen Closet in hall 24" wide, 20" deep. Make it 20" wide and give more space to the laundry. Either take a full 24" deep (and shorten the Br4 kitchen counter) or make it 15" deep (and lengthen the Br4 counter). I like 20"w x 24" deep, like this.

Ba2 23" wide (we could turn the studs flat on the tub plumbing wall and gain 1-1/2". The space is 18" deep on one side, 30" deep on the other. Make it 20"w x 15"d and create a pipe chase.

First, there was a palm tree.

The Chinese Fan Palm (Trachycarpus Fortunei) in the backyard was fighting the Carkeek vibe. It was likely a fun bit of serendipity before it was exposed by the removal of the rhododendron hedge.

Architect Ken Jensen contacted me about my post in the Nextdoor "free things" section. He and his helper, Hamilton, weren't able to get it loose on Friday, so they came back with other tools Sunday and took it out. Then we discovered that it was likely about 300 pounds. With the modest root ball in Ken's wheelbarrow and the tied-up fronds on my hand truck, the three of us tugged and strained and grunted it around the side to Ken's truck in front. Just to promote a successful end, I followed them to Ken's house and helped take it off the truck and plant it in the pre-dug hole.

First, there was a palm tree,
Ken and Hamilton spent an hour working on the tree on Friday. Part of the lower pond had to be dismantled.
...then there was no palm tree...

Success! Now we wondered what do you do if you ever actually catch a palm tree?

Three hundred pounds, at least.

I followed Ken to his house
Then there was.

Ken's house is painted tropical blue. He plans to remove the shady maple to the left.

No more tropical or Chinese trees! Ken mentioned that they had to leave a tap root. He said he couldn't assure me that it wouldn't grow back.

Saturday, June 6, 2015

Embedding the cubes

You may recall (from a few hours ago) that I wrote:
The high row of cubes is full height, which means the roof does not engage. That is, the soffit is at the plate height, unlike the existing house. I plan to experiment with bringing the high roof down 13" so the high row of cubes will be shorter. This will either 1) seem just right, 2) look like a mistake, or 3) make clear how unimportant the cube grid really is.
So here is the model with the Trees Room roof and ceiling 13" lower (13' 8" instead of 14' 9"). I'm thinking that it's #3. I have noticed that the grid's precision and accuracy doesn't matter as much as that it aligns with windows and doors.


Final design for construction documents

Heads-down drawing for the CD phase. Final design is more disciplined; the fenestration is coming together.
Bathroom 1--vanity in an alcove, not behind a door

Bathroom 2--wide vanity, single vessel sink

New l-shaped window (Bedroom 1). The better to see the rockery, my dear.

Matching l-shaped window in Bedroom 4. Horizontal windows can be sliders or awnings.

Center the bed under the horizontal windows, which subtly defines a "living" space near the door.

Entry has 44" cubes. Transom over door is now awning windows.

Several glass companies told me they can do this; one volunteered a price of about $1600
The glass entry roof makes sense, because the inside-outside cube should be visible on the approach. Also, note the importance of the high soffit.

The high row of cubes is full height, which means the roof does not engage. That is, the soffit is at the plate height, unlike the existing house. I plan to experiment with bringing the high roof down 13" so the high row of cubes will be shorter. This will either 1) seem just right, 2) look like a mistake, or 3) make clear how unimportant the cube grid really is.

The new window wall design can go up or down easily--only the height of the upper fixed windows changes with the ceiling height. We can't go down too far, though, because the soffit needs to clear the ridge, as shown in the following photograph:

Windows across the front have 22"-high awning windows. Tall, narrow windows rest on the kitchen counter. 

Open plan room with the cube grid. No columns necessary--we even lost the north-south beams in the entry. I reserve the right to build the V-columns as a decorative element, but the structure doesn't require them.

The window wall is now more fixed glass, with a clean band of awning windows. The handles are @92", which I can reach standing on a chair. (I can reach 96" on a step ladder.)

Wednesday, June 3, 2015

Furniture

I like the mix of Ikea (like the Poang chair) and timeless 20th Century designs, like the Noguchi coffee table. I'll use this post to collect pieces, the better to find knock-offs at reasonable prices.

George Nelson, X-Leg Table for the dining table.

LC6 table by Le Corbusier.

The Min Table, by Luciano Bertoncini (2011). Matte lacquer glass top can be wood-veneer MDF. Powder-coated steel frame.

Cesca side chair in cane by Marcel Breuer. (They're very comfortable--WED had a conference room with them.)

The Prouvé Standard Chair
Series 7 chair by Arne Jacobsen

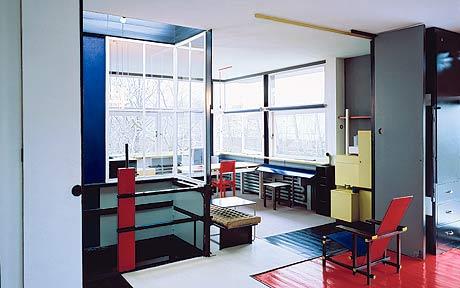
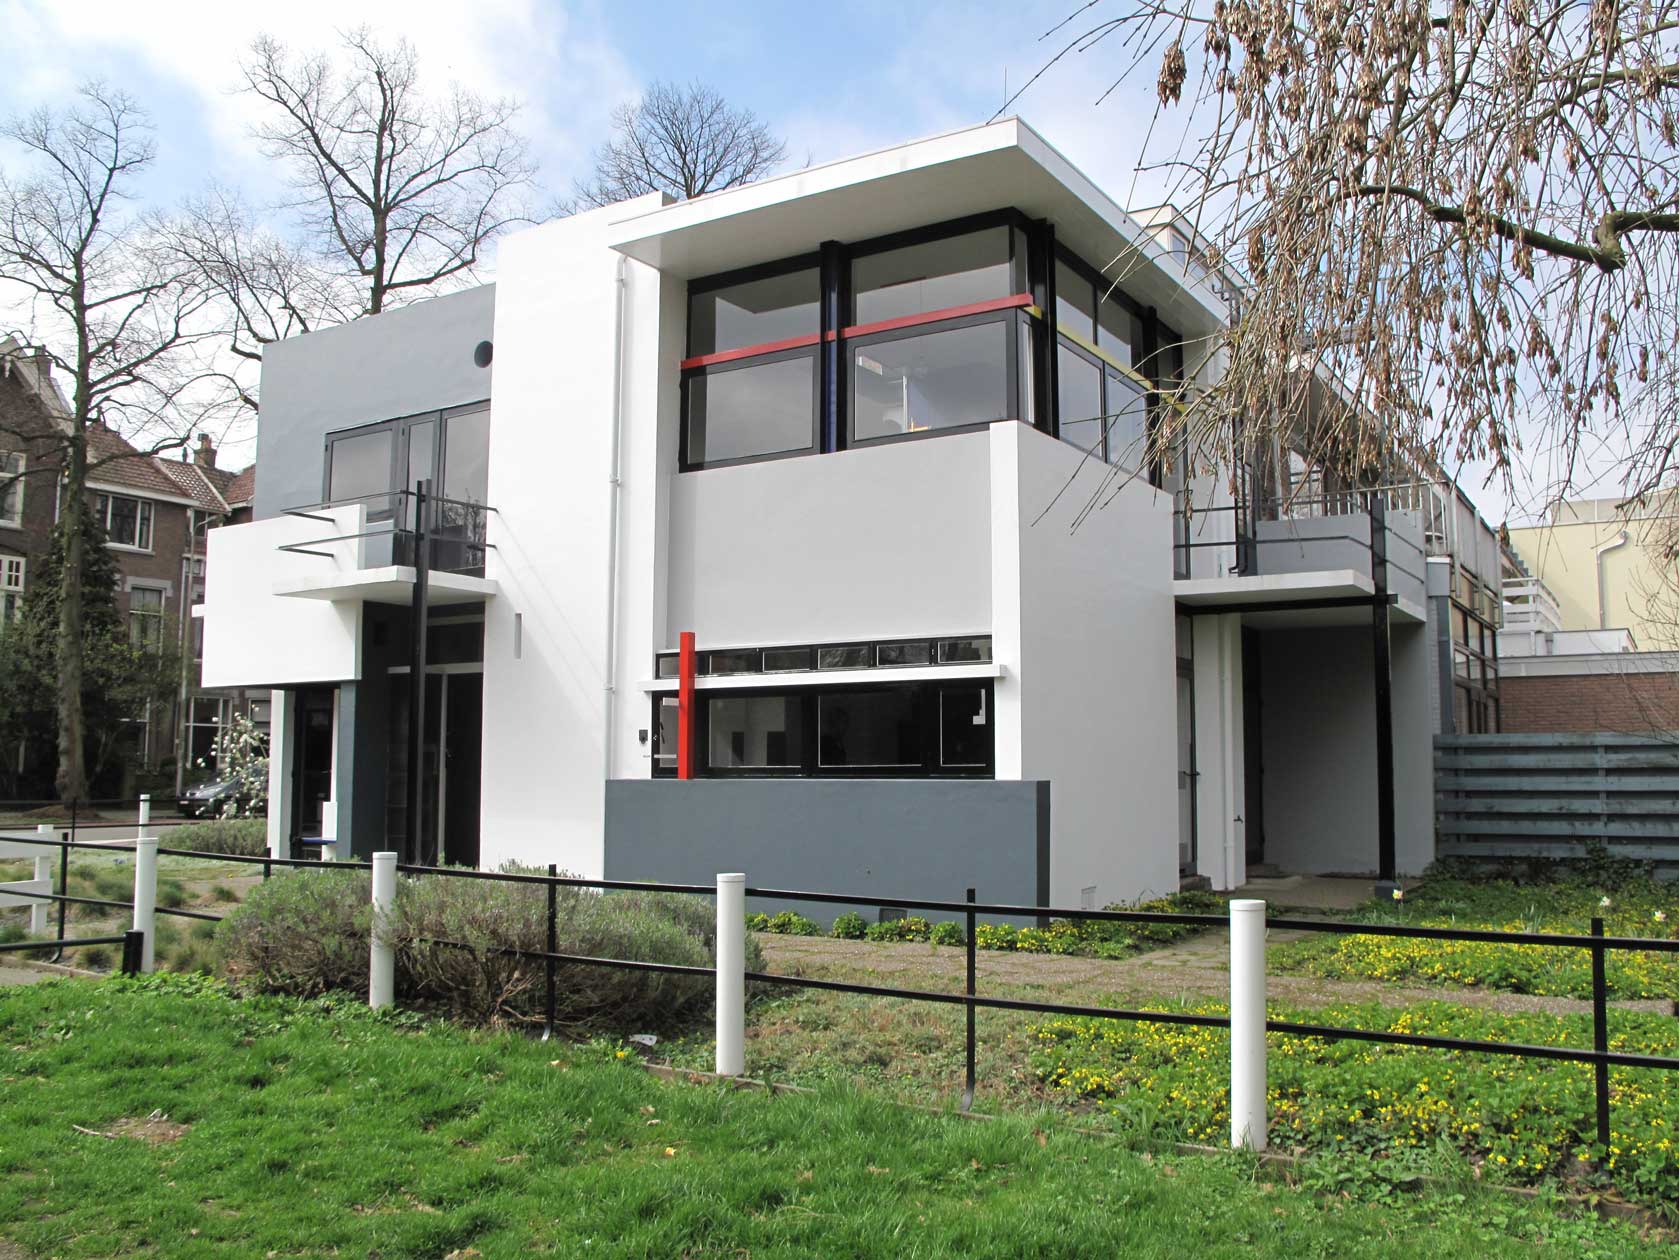
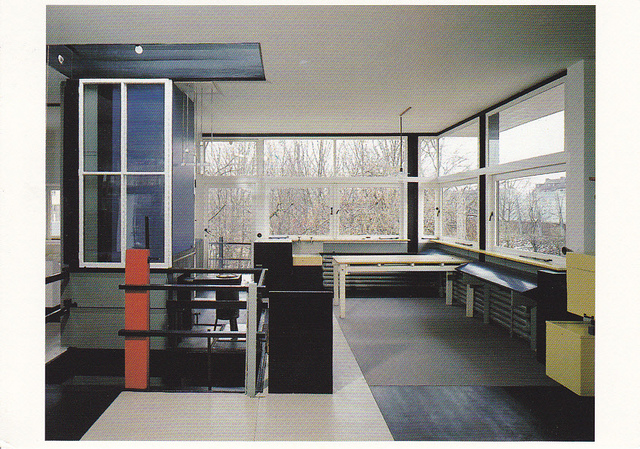
The Schroder House

This post is a place to collect photos and notes about Gerrit Rietveld's Schroder House, which has been a looming, unfocused mental model for me whenever I think of "architecture."
Gerrit Rietveld designed this home in 1924 for Mrs. Truus Schroder-Schrader.
The house is prime example of the De Stijl style (De Stijl means The Style, so it's a soup du jour of the day situation.)

Tuesday, June 2, 2015

Rain Protection for Jehovah's Witnesses

Peggy suggested hanging a roof at the entry, rather than some complicated cantilever beam thing. I like the idea of glass, because the entry ceiling will be interesting, so why not see it as you wait at the door.

Home Depot has a $400 model with stainless steel brackets and a curving clear/grey polycarbonate roof (Palram Aquila 2050).
Here's what I want: CRL Glass Awning system. I'll contact a glass dealer. Maybe they can hook me up with the glass connectors, wall brackets, and cables.

Thinking about it, I'm a little worried about uplift. A tension cable system would do nothing to stop the wind from flattening the glass against the wall. A rod in tension could handle the compression wind load, but that's why it would be better to buy someone's engineered glass-holding system.

You Floor Me

Update 6/8/15: What I really like is a matte gray tile in a grid or offset grid pattern, like this:
This is elegant (in my mind). 24x24 tiles are heavier and the corners break more easily. Maybe 16x16?

Tile that looks like wood, in a light gray, also works.

I've always thought that we'd have engineered hardwood in the main part of the house with carpet in BR3 and ceramic tile in the three bathrooms. You don't want to break up the spaces; you do want to draw the eye from the Trees Room across the entry, dining and into the kitchen. But the oak in BR1 and BR2 can be refinished and Geoff Hill says buyers like authentic wood floors. BR4 can be refinished, too, and Jeff Lane can feather in new wood so you couldn't tell.

The problem with underfloor hydronic heating is that water temperatures above 80° can damage wood floors, and poorly-insulated homes require as much as 90° water to heat a room to 72°. The floor finish that is to be avoided is carpet, because it takes more heat to push the heat through the carpet into the room.

Talking with Peggy, we got on the subject of slate. Tile could run into the bathrooms, not breaking up anything. She thought a pattern like this (but with darker and more neutral colors):

I like it, but I also like a grid pattern to match the cube entry. They sell 16 x 16 gauged slate tiles, 3/8" thick, for $3.25/SF, and we have about 1800 SF. ("Gauged" means uniform thickness. You might use "ungauged" on the wall.) So $5,850 would put the exact same floor material in every room, every closet, every bathroom of this house. I would really like that consistency. We'll need an area rug in the Trees Room for sound absorption anyway. Shaw offers Metropolitan Slate tiles in several colors, including the gray Luna Park. They make 6x6, 12x12, and 18x18 as well as matching cove base.

Monday, June 1, 2015

A Few Design Tweaks Later

A few changes to the model.
Bedroom #3 with a tall sliding door and a modern fireplace.

Bedroom #3 fenestration from the backyard

Hanging light array in entry, larger transom, slate-like tile throughout

Dark cabinets in dining, light birch in kitchen

Door-less lav sink widens hallway. Laundry counter to left.

Metal and glass entry roof. Note taller kitchen windows.

Front elevation as it looks now

Steps Project

I want to remodel the whole front yard. New hardscape, and so on. But at the moment, my path from the driveway to the house is only barely w...